
ஜெக்கார்டு தறி பேட்டு , துணை ஊடு நூல் பேட்டு, துணை பாவுநுல் பேட்டு, பொன்-வெள்ளிச்சரிகை
The beloved, traditional Kanchipuram saree motifs and designs are an entity of their own. They were designed from the mind’s eye of the master weaver and later translated onto the saree via a Jacquard mechanism. Kanchipuram temple architecture, sculptures, idols, deities, flora and fauna have taken their immortal forms onto the Kanchipuram silk saree as a result of the weaver’s creative interpretation.

 Jacquard loom has been a significant mechanism in facilitating the transfer of designs hand drawn on graph paper onto the saree border, body or head-piece. A punch card machine prints the design by perforating a metal punch card.
Now, with technological advancements there are Computer Assisted Motifs (CAM) or Computer Assisted Design (CAD) software developed specifically to print a certain motif or design on a metal punch card.
These punch cards are perforated with holes, thus allowing silk threads to pass through them and then woven onto the saree. For an instance, weft silk threads thread through a set of laced paisley designed-perforated Jacquard cards (similar to stencils); corresponding exactly to the paisley perforations and then falling into place as a paisley on the border of a saree. How genius!
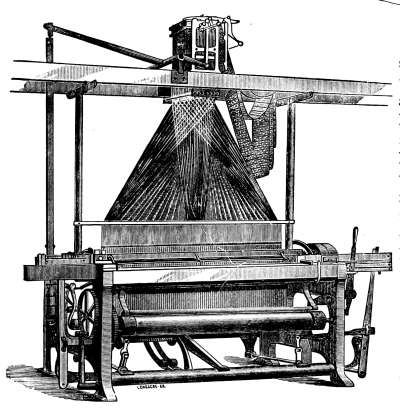
There are approximately 120 Kanchipuram motifs and through this Jacquard mechanism, they become feasible despite the complexity of the designs. So, the printing of the metallic perforated cards are loaded onto the Jacquard machine which has been assembled as part of the throw shuttle draw-boy harness pit loom. Easily known as the Jacquard loom.
ஜெக்கார்டு தறி பேட்டு = Jacquard loom patterned borders
துணை ஊடு நூல்= Extra Weft Thread
துணை பாவு நூல் = Extra Warp Thread
தகடு அட்டை = Metal punch cards used in the Jacquard
வடிவங்கள் / வகை மாதிரி = Shapes, designs, motif.
பொன்-வெள்ளிச்சரிகை / Zari = Usually red silk threads electroplated with higher percentage of pure silver and lower percentage of pure gold forming the metallic threads.
Patterned Borders
First let’s understand the Jacquard Mechanism. Joseph Marie Jacquard, a Frenchman invented this mechanism in 1801 for easy damask textile weaving. This machine he invented was an amalgamation of his own silk weaving machine together with 3 other inventions made by his 3 predecessors.
- Year 1725: Bouchon tested on a band of perforated paper cards. He invented a bar that could be manually operated, and when pressing this bar against a set of horizontal wires enabled a pushing force which enabled a forward movement of wires from the opposite direction. This in turn activated vertical wires which were looped at the lower end to form a comb-like rack connection.
- Year 1728: Falcon modified Bouchon’s band of perforated paper cards to a chain of cards wrapped into a square cylindrical prism.


3. Year 1745: Vancanson assembled the perforated chain of cards onto the perforated square cylindrical prism that could roll back and forth when activated at each push of the bar on top of the heavy weights that hang at the end of the loom. The movement of the cards forwards and backward was enabled by a pulley system. He also invented the griffe that could move upwards and downwards by attaching harness cords and hooks that went through a comb rack. So he had his perforated cylinder with the perforated cards on top hooked to the griffe that could move up and down due to harness cords that were attached a perforated comb rack which threaded through the holes to the heavy weights at the tail end of the loom.

4. Year 1801: Joseph Jacquard improved this mechanism in having thousands of Jacquard cards to be attached to the mechanism in allowing patterns to be woven on the fabric by selectively lifting a set of hooks which in turn lifts only the warp threads to allow for interlacing and creating the pattern.


Watch these 3 videos on the Jacquard loom.
https://youtu.be/OlJns3fPItEhttps://youtu.be/MQzpLLhN0fYhttps://youtu.be/K6NgMNvK52A
Working out the pattern to be formed on the saree border:


Step 1:
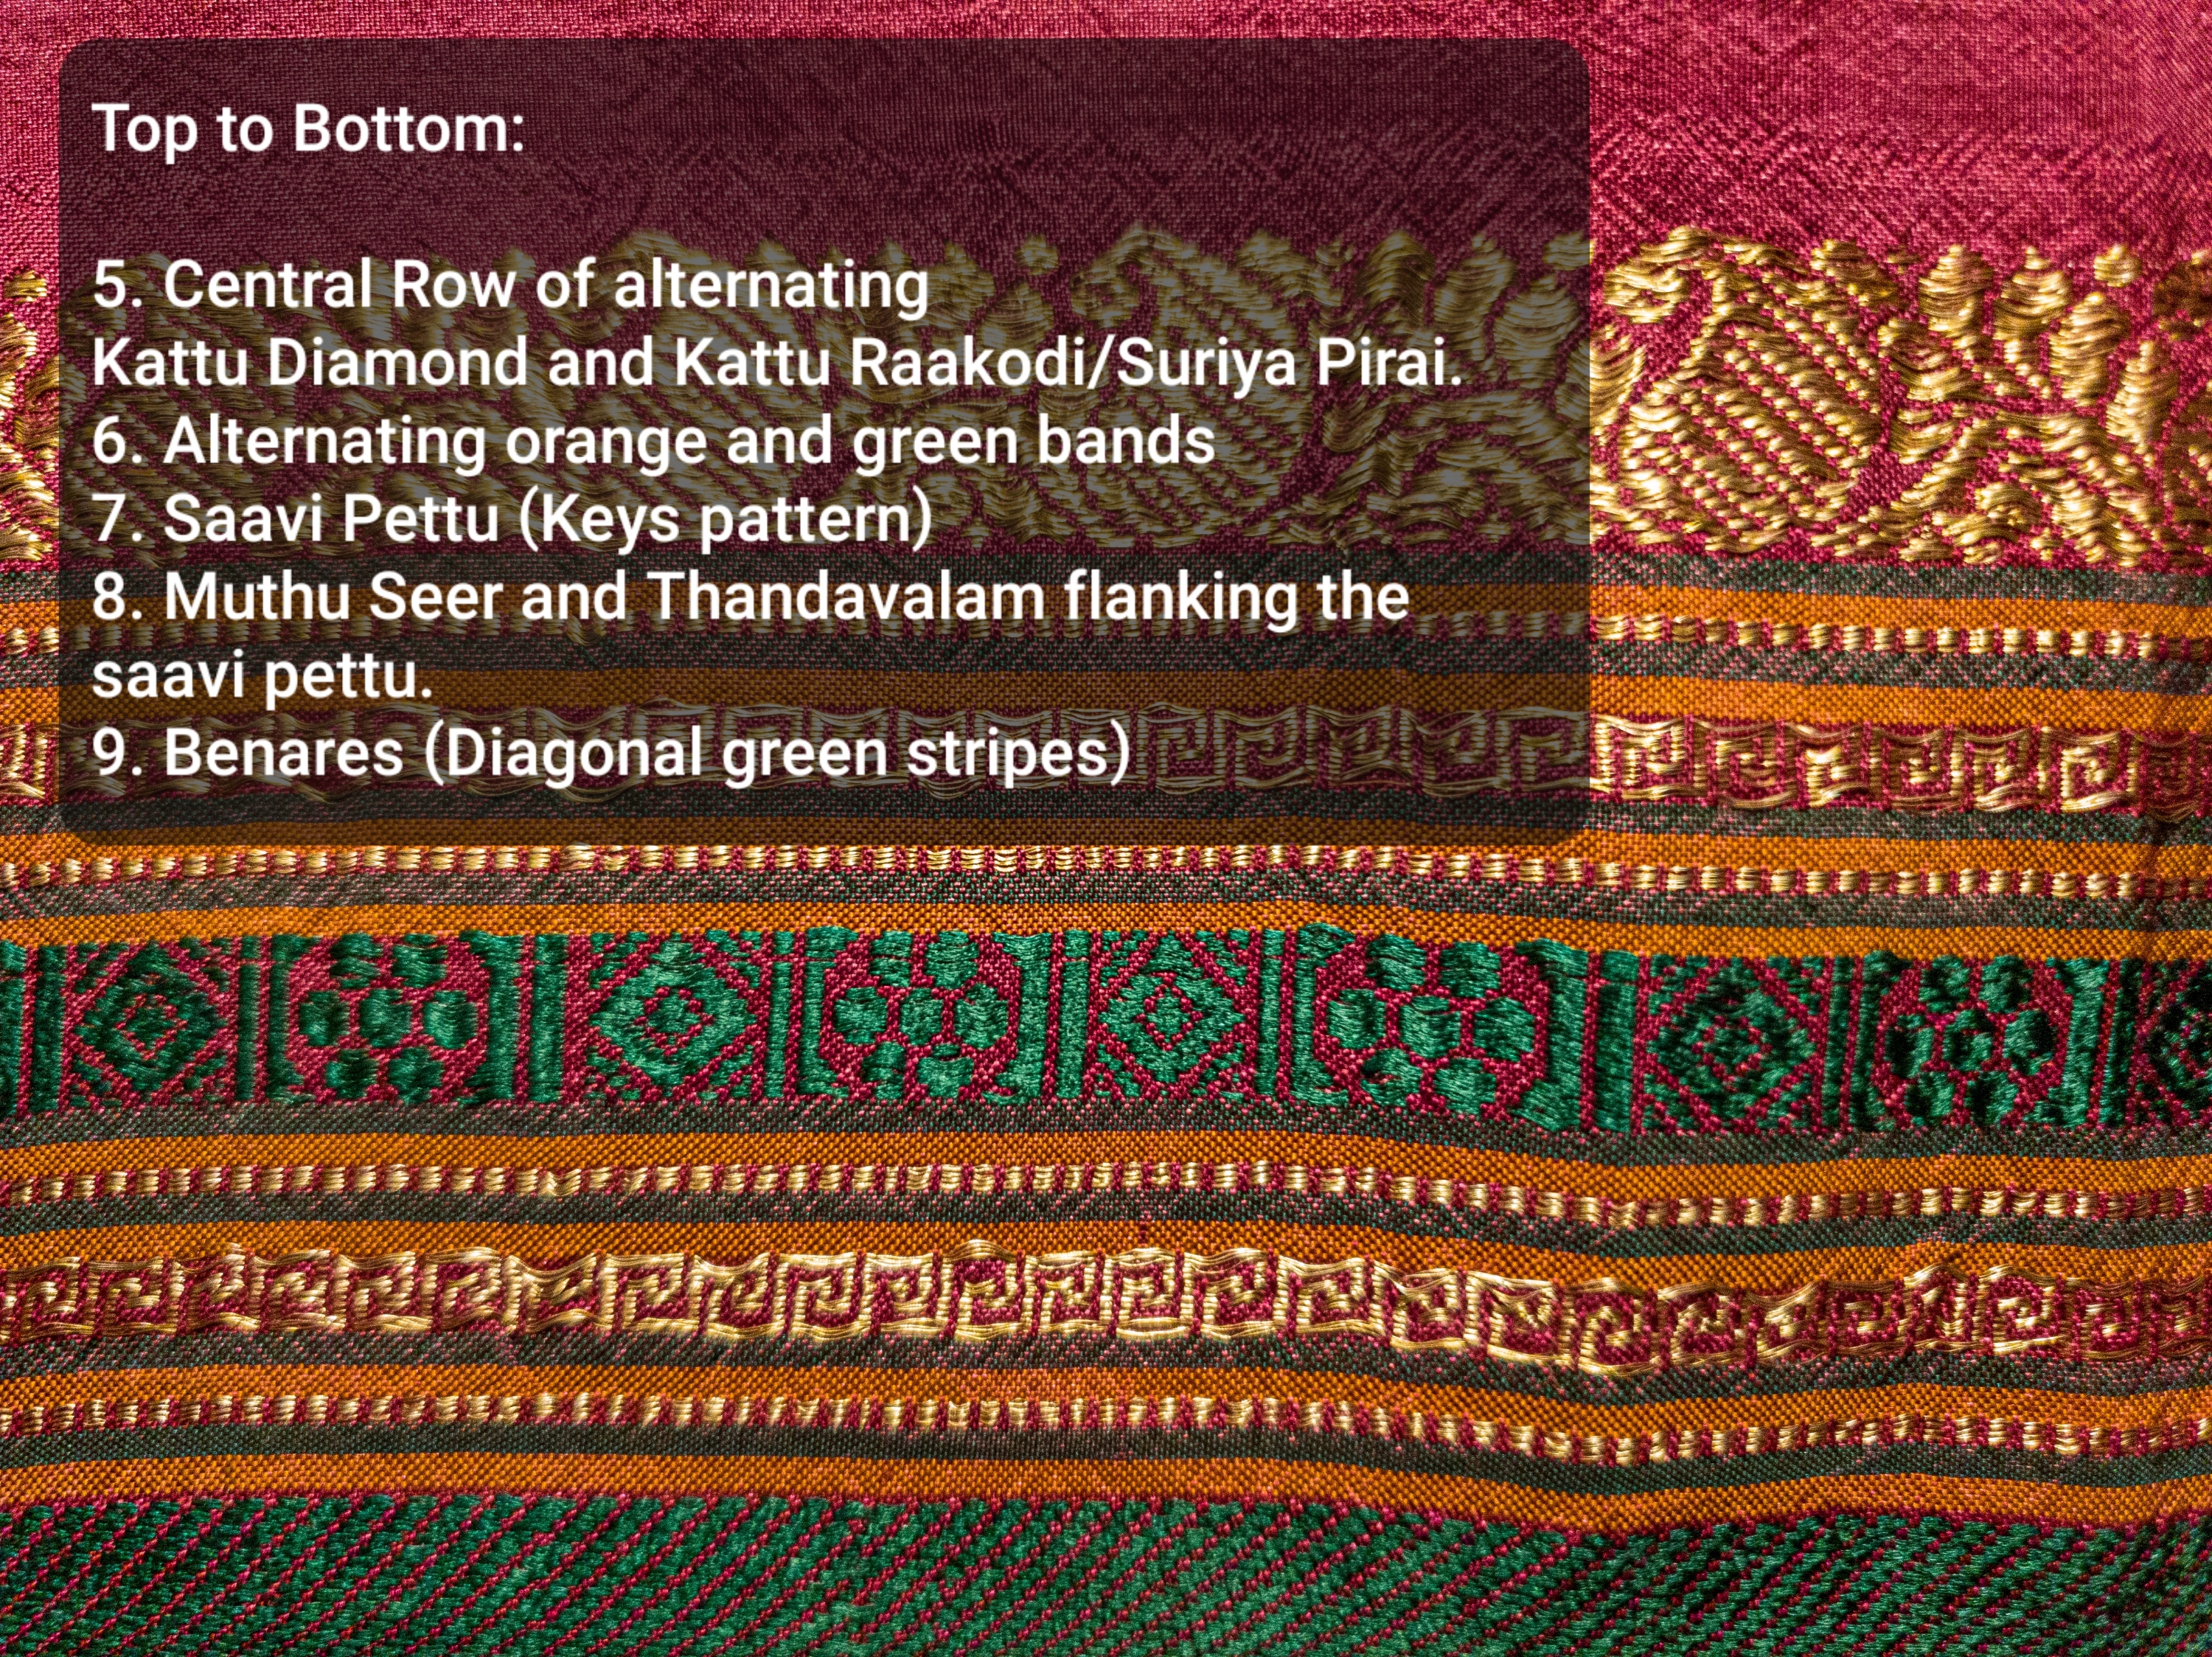
On my border pattern, from top to bottom:
 First row of alternating Maangai (mangoes), and Thamarai (lotus) in full bloom.
Second row of Green Thandavaalam (Track stripes) flanking the Muthu Seer (Pearl string).
Third row of the Saavi Pettu (Keys pattern).
Fourth row of Muthu Seer again flanked by Green Thandavaalam.
Fifth or the central row of alternating Kattu Diamond (Diamond enclosed in a square) and Kattu Rakkodi/Suriya Pirai (Hair Ornament in the shape of a sun that has six circular gemstones around a central gemstone) which is also enclosed in a square in this case.
Sixth row of Saavi Pettu (Keys pattern) which are flanked by the Thandavaalam and Muthu Seer.
Seventh row of Benares Pettu (The diagonal stripes pattern).
This entire border would have been drawn on graph paper before technology took over and then transferred to the Attai by manual perforating tools or the punch card machine. The perforated cards with the design will be later fitted onto the cylinder which is on the Jacquard connection.
 Dobby Punch Card Machine.
Source: https://www.gutenberg.org/files/54193/54193-h/54193-h.htm The Project Gutenberg EBook of The Jacquard Machine Analyzed and Explained, by E. A. Posselt
Step 2:
For my borders with the repeating designs, a repeating punch card machine is used. So that the same design can be replicated in hundreds.
Step 3:
The cards then need to be laced which can be done manually or by machine.  The Project Gutenberg EBook of The Jacquard Machine Analyzed and Explained, by E. A. Posselt
Step 4
The jacquard harnesses are already tied up to the loom in a certain way depending on the location of the pattern to be made on the fabric. This is fixed and therefore cannot be changed. A weaver mentioned in the video that they change the tying up of the harnesses once a year only if there is a need for a certain design on different parts of the saree, that too with the help of an engineer. Otherwise continue with the already, fixed tied up harnesses. Only the design punch cards can be changed whenever a new pattern is to be made. The chain of cards are connected to the Achu (twines). So there are 2 sets of Achu perpendicular to each other. Therefore have an up-down motion. Weft silk threads are tied strand by strand to the Achu (twines).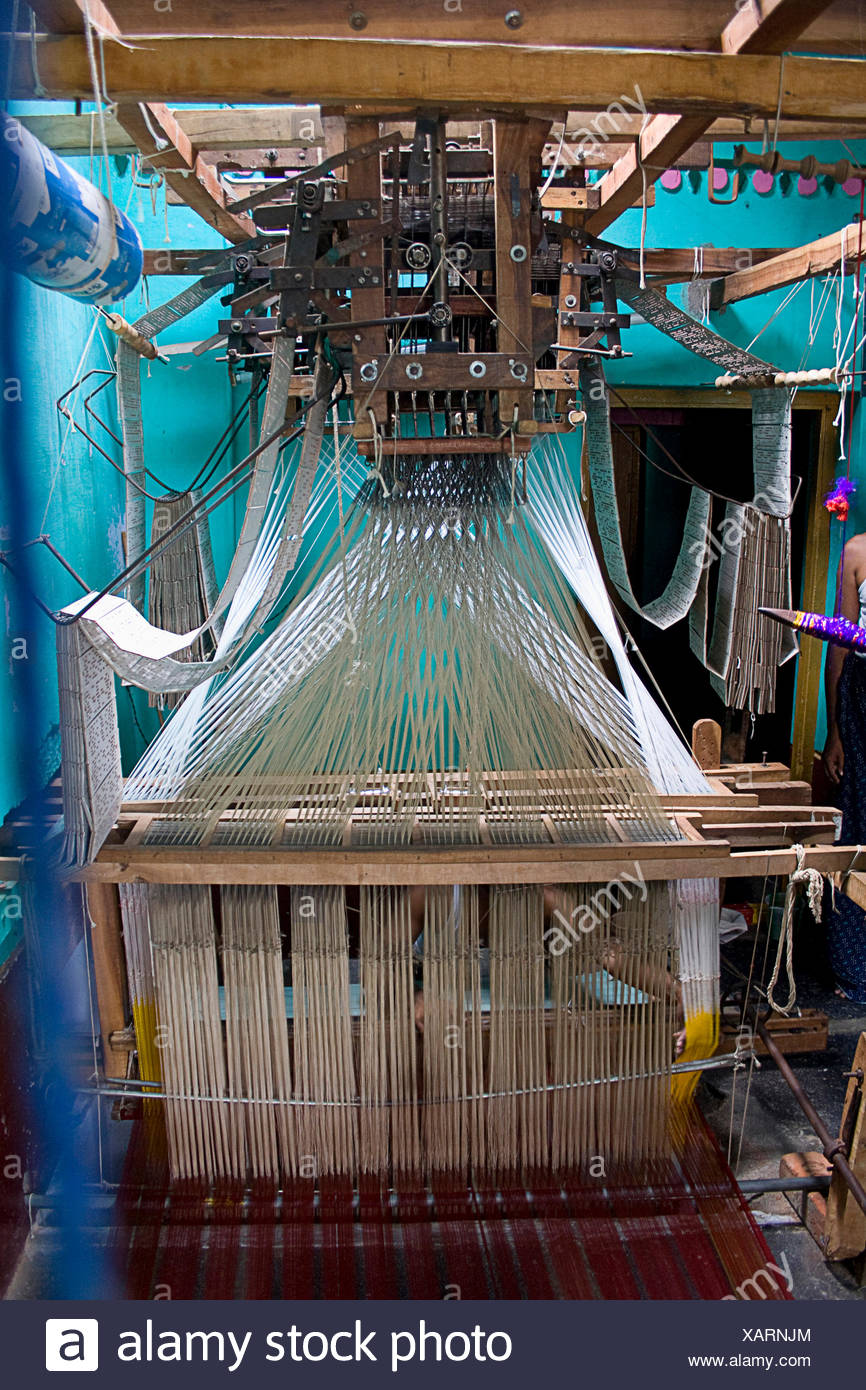 An Indian Pit Loom with the Jacquard Connection. Source: Google images.
Step 5
There are usually 240 hooks Jacquard connection for designs to be done on the body and 120 hooks Jacquard connection for pettu karai (patterned borders). So usually the Jacquard loom are fixed with two boxes that will facilitate pattern making on the border and the body of the saree. These two connections are activated by pedaling of the feet.
A box with 240 hooks is connected to a pedal that can be activated by stepping on the right feet pedal. This to make designs on the body. While, another box with 120 hooks is connected to a pedal that can be activated by stepping on the left feet pedal. This to make the patterned borders. For heavy zari work they use the 480 hooks connection. In short they call it 240 box, 120 box, 480 box, even up to 1000 over hooks (1000 box and above) with advanced technology.

A weaver on his loom with the jacquard connection. Source: Google images.Photos of different styles in tying up of harnesses depending on the location of the pattern on the fabrics and the number of hooks required for the pattern.
The Project Gutenberg EBook of The Jacquard Machine Analyzed and Explained, by E. A. Posselt
The Project Gutenberg EBook of The Jacquard Machine Analyzed and Explained, by E. A. Posselt
The Project Gutenberg EBook of The Jacquard Machine Analyzed and Explained, by E. A. Posselt
Step 6:
By pushing back and forth the reed of the loom, it allows selected warp sections to be lifted. Through the pulley system, the weft silk strands are threaded through the holes of as the warp sections are lifted, forming patterns on the saree.The movement of the griffe in the Jacquard connection lifts the hooks, lifting up the section of warps. When the hooks are raised, the perforated square cylindrical prism with the cards moves downward from the needle board. So the needle thread through the cylinder hole corresponding to the design.
Hooks raised up, the warp sections are lifted creating a shed to allow the weft yarn to be filled in (manually done by the weaver with the weft Naada. The cylinder with the holed card moves down. Needle connects to the cylinder with the particular card through the hole.
When there is no need for the sections of the card with no holes ( the design portions have holes punched in the cards. No design;no hole), the needles move backward, the hooks will not come in contact with the griffe. The cylinder with the cards moves upward toward the needle board. So the hooks become stationary (not lifted, hooks down) , allowing the warp yarn to be woven as per usual.
Hooks down, the warp sections move down, the cylinder with the card moves up. Needle not needed as there is no hole according to the design on the card. Needle moves back up. No weft insertion as there is no shed. So the warp sections come down to be woven.

Watch this video to understand the raising of hooks!
The alternating lifting of warp creates an opening to enable the weft yarn shuttle (manually done by weaver) to pass through to complete the design.
Step 7:
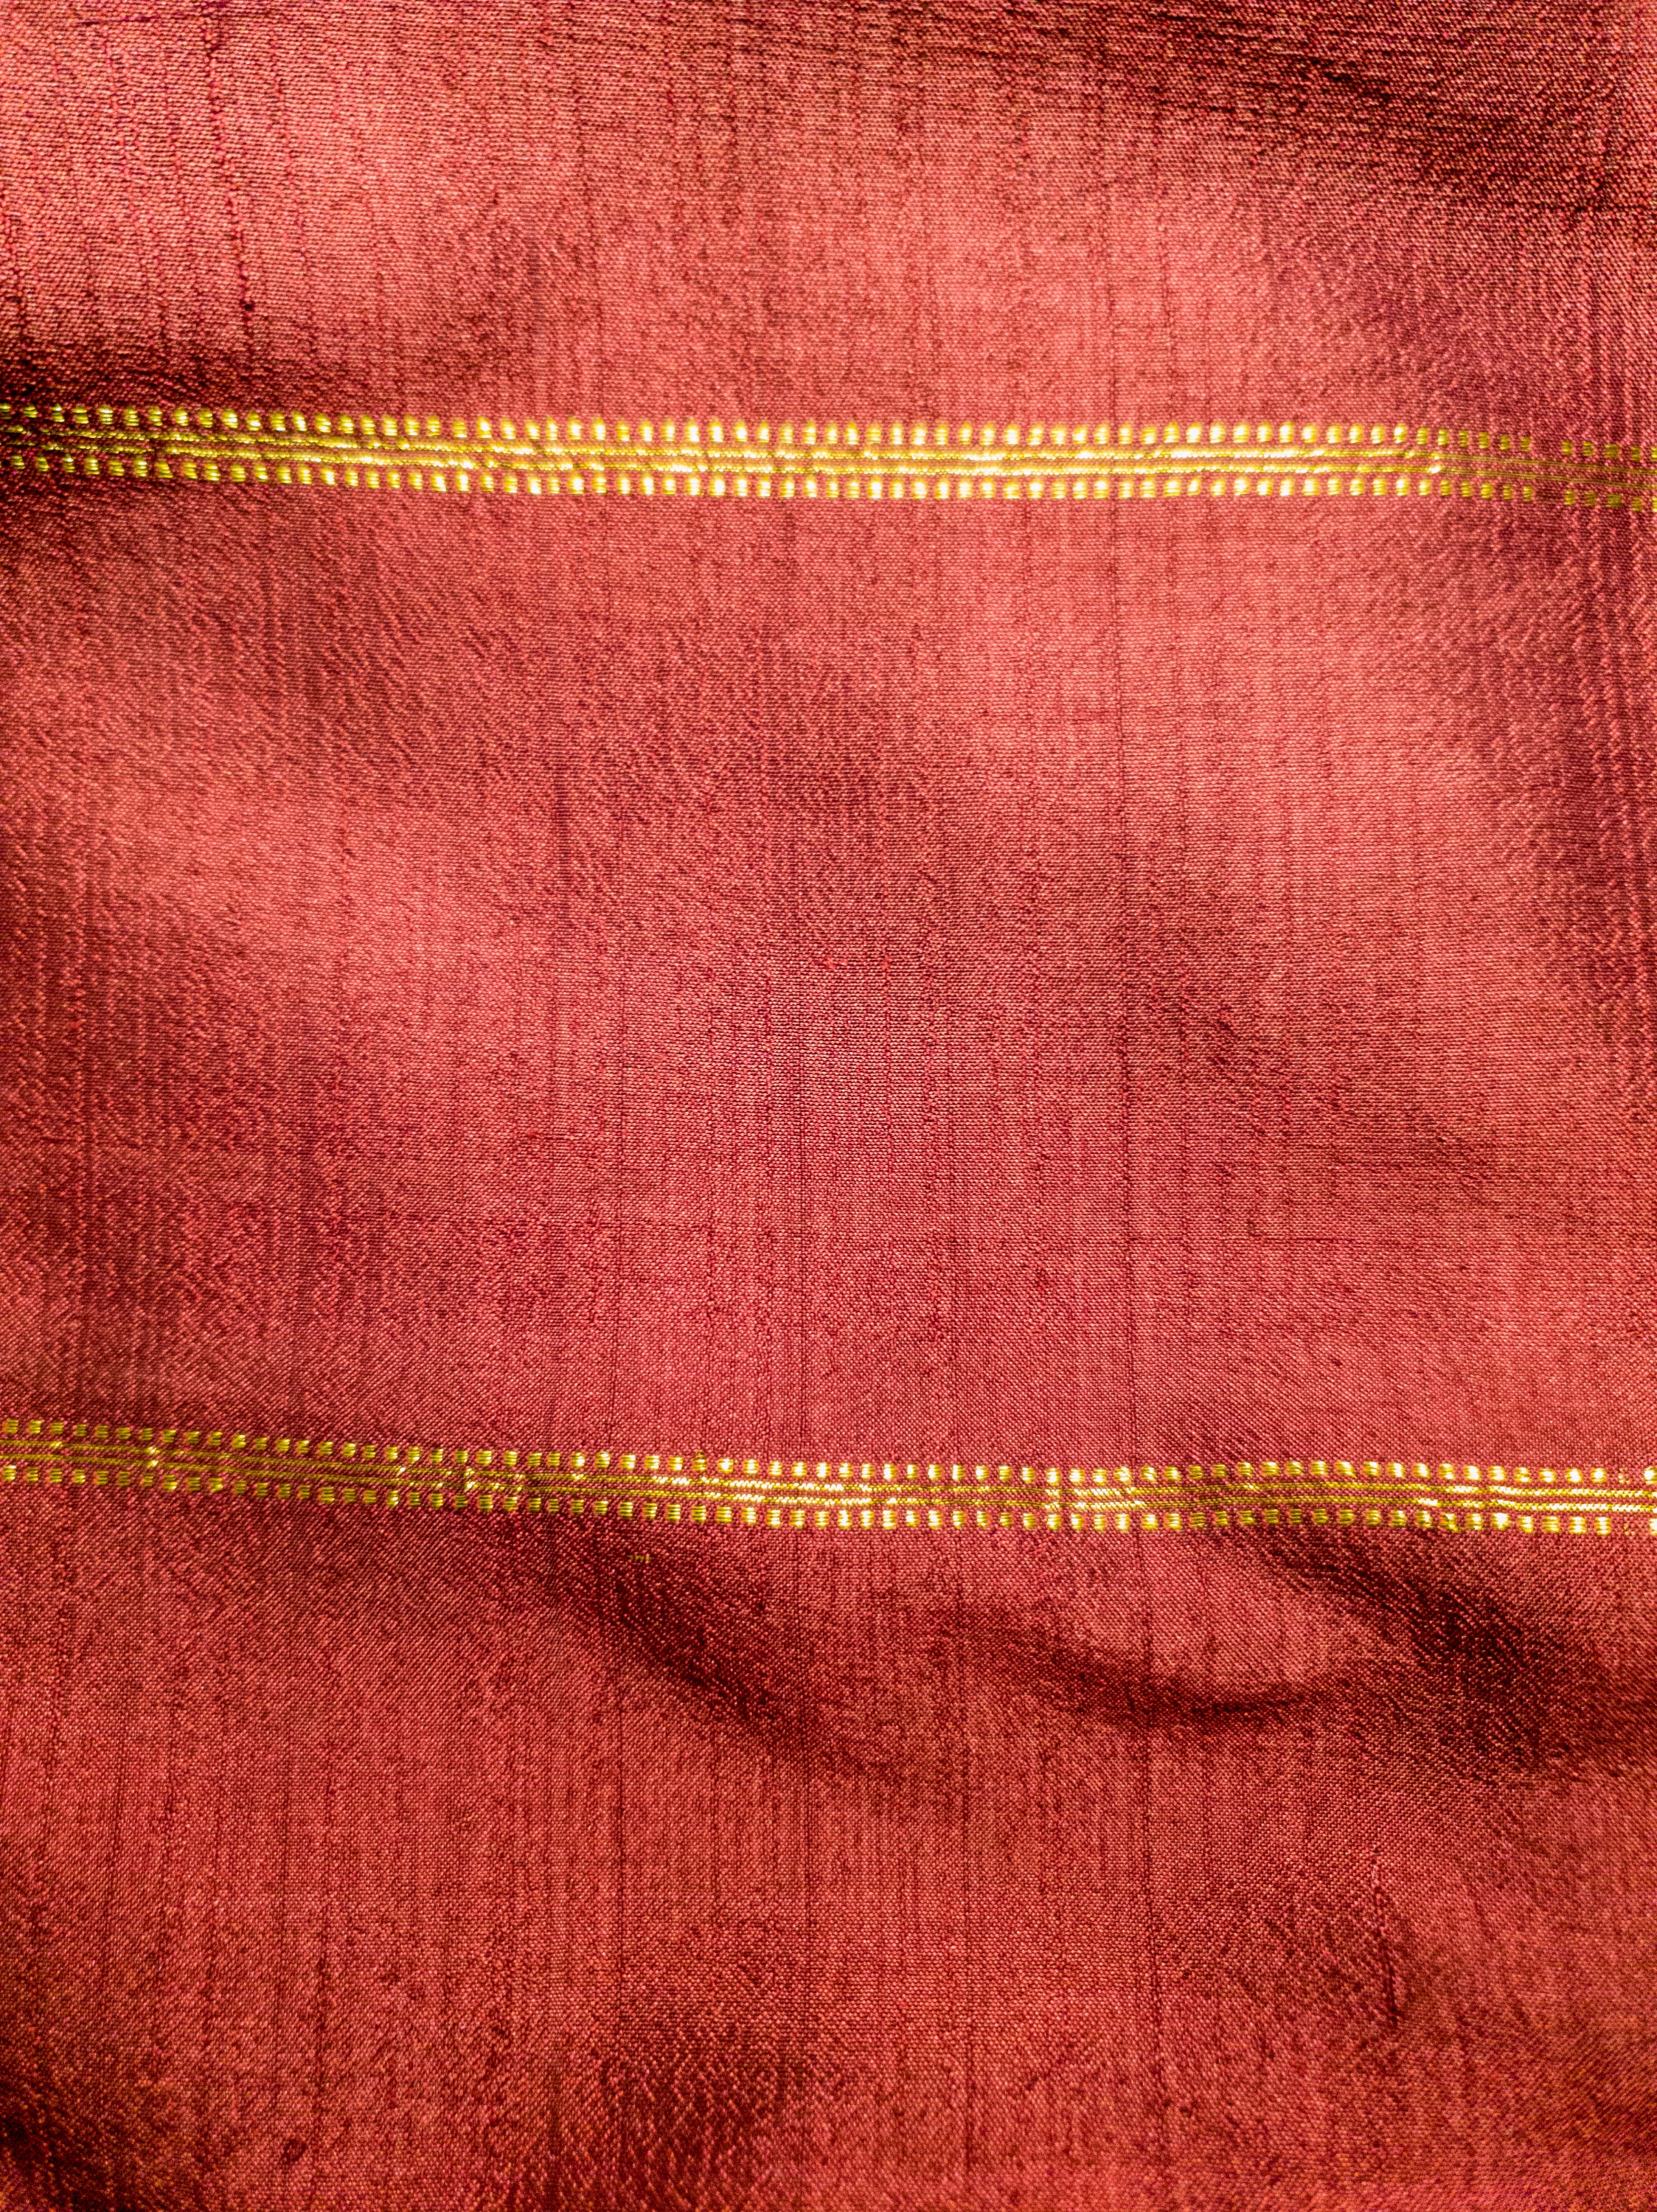
There are further designs done using the Extra Warp Shuttles which have the extra warp threads to be done on the borders to complete the design. The Zari (gold metallic threads) are also wound onto the Thaar (pirn rods) and fitted into the Naada (shuttles) as extra warp zari threads that are interlaced to embellish the pattern.
So the weaver manually interlaces the Extra Warp green silk threads through the extra warp shuttle moving lengthwise on the border to coat the motif in green.
Extra warp orange silk threads to make the orange bands in between the motifs on my border. Thus, completing the border design.
Alternating with the Extra GOLD Zari shuttle which the weaver manually interlaces on the border weftwise (also done warpwise) to complete the design that came through the jacquard in gold. In this case, the first row of mango and lotuses in gold zari. And the other two rows with the Saavi Pettu that are also coated with the gold zari.
So what happens if there is a mistake when weaving the design? The weaver stops and has to unpick the threads of the incorrect part of the design or motif. Then redo that specific motif. This can be done on a handloom saree. However, such corrections cannot be done during the weaving by an automated powerloom machine.
Muthu Kattam on the Blue Udal of my saree
The traditional Pearl Checks fondly known as Muthu Kattam are woven using the Extra Warp and Extra Weft shuttles to form the grids.
Red silk threads are wound onto the Thaar (Pirn rod) and fitted into a Naada (fly shuttle).This case it is easier to have two of such shuttles for the weaver to interlace the red extra warp and red extra weft threads directly on the saree to form a single square.
This extends out to become the pattern field of the Blue udal through meticulous and laborious efforts by the weaver.The geometric precision is calculated by the genius weaver using his eyes to work out the size of the consequent squares made. This is known to be the ‘Kann Alavu’ in the Tamil tongue.
Muthu Kattam are precise in the design with tiny gaps in between the red Muthu threads. The four corners of each square is marked by the cross stitch when the extra warp thread meets the extra weft thread to complete the junction.
This being woven independently as extra warp and extra weft on top of the blue udal has to be synchronized with the weaver’s feet movement as he steps the treadles in a ‘2 up and 2 down’ pattern. Such is the manual dexterity of the weaver and his exquisite craftsmanship.


Found this tamil adage apt to describe the weaver’s work:
‘காஞ்சிபுரம் சென்றால் காலாட்டிக்கொண்டே சாப்பிடலாம்’
கைத்தறியில் நெசவு நெய்யும் போது, கைகளையும் கால்களையும் பயன்படுத்தி தான் நெசவு தொழில் செய்ய முடியும் என்பதாகும். இப்படி சம்பாதித்த வருமானத்தில் உணவு உட்கொள்ளலாம் என்று விளக்குகிறது.
Useful videos to understand the Jacquard Loom Kanchipuram Silk Saree Weaving:
Kanchipuram Silk Trivia
- Pure Zari threads are procured from Surat, Gujarat. Electroplating done on red silk threads / dipping them into 5% of pure gold and about 40-50% pure silver.
- Now there are tested zari (not pure gold) but electroplated with copper and tiny amount of gold to reduce cost.
- The dull raw silk yarns are washed in the River of Pallar, Kanchipuram honouring the age-old tradition and to give the silk their lustrous sheen.
- Mulberry silk are procured from Bangalore as they have an ideal climate condition to rear these particular breed of mulberry silkworms.
- Pre-loom preparation in tying the warp yarns to the loom takes about 20-25 days usually. There are about 9000 looms made using raw silk threads (kora) on a typical loom.
- The joint between the end-piece and the body may or may not have Petni work. As such, they can be dyed using coloured solutions. OR woven without doing the Petni work.
- From about 1kg Silk Yarn = 5200 strands can be formed = 3 sarees can be woven.
- Out of the 1kg of silk yarn, 20% is lost during degumming process. Thus, left with only 800 grams for weaving.
- About 2 to 5 silk strands can be tied to each loom thread.
- Kanchipuram silk saree has its own Geographical Indications Tag since 2006


References:
Posselt, E. A. (2017 19). The Project Gutenberg eBook of The Jacquard Machine Analyzed and Explained: With an Appendix On the Preparation of Jacquard Cards, by E. A. POSSELT. Retrieved from https://www.gutenberg.org/files/54193/54193-h/54193-h.htmThe Project Gutenberg EBook of The Jacquard Machine Analyzed and Explained, by E. A. PosseltJacquard Loom
https://www.nms.ac.uk/explore-our-collections/stories/science-and-technology/jacquard-loom/நூலோடும் தறியில் நுட்பம் செய்யும் கைகள்
#iwearhandloom #kaithari #kancheepuramsilksaree #kanchipuramsilksaree #saree #tamilnaduweave #weavesoftamilnadu #kancheepurampattupudavai #pattupudavai #kanchipurampattupudavai #petnitechniqe #petniwork #petni #korvai #karai #thalaippu #mundhanai #jacquard #flyshuttle #extrawarp #extraweft #zari #silk #mulberrysilk #murukkupattu #kanjivaram #kanjivaramsaree #kanjivarampetni #kanjivaramsilksaree #kanjivaramsilk #kancheepurampetni #korvaikarai #korvaiinterlock #korvaikanchipuram #jacquardloom #jacquardweaving #kanchipurammotifs #zari

Pingback: Part II Second Hallmark of Handloom Kancheepuram Saree : Korvai Interlock Weftwise Between Borders, Body and Headpiece of the Saree கைத்தறிக் காஞ்சிபுரம் பட்டுப் புடவையின் இரண�
Pingback: Part I First Hallmark of Handloom Kancheepuram Saree : Petni Technique கைத்தறி காஞ்சிபுரம் பட்டு புடவையின் முதல் அடையாளம் : பெட்னி வேலைப்ப�
Pingback: Handloom Kanchipuram Pattu Pudavai – Rebel Arunaa
Pingback: Handloom Kanchipuram Pattu Pudavai – Rebel Arunaa